It’s been a while since my last blog post so I thought I would update you on where we are up to in terms of the fit-out of our beloved Delica; Digby
I’m calling this phase the “Second Fix” not because it’s the next step in the build process, but a lot of what I have been doing recently is redoing stuff a second time…! After building the rear wardrobe unit I realised that I had positioned the bottom openings far too low to allow for the 15cm mattress we were planning on, and that the openings were a bit larger than we needed so I re-designed and re-built the front of the wardrobe to fit the new plan I had also built the carcass of the right-hand side unit as part of the “First-Fix” but again realised that it was both too long and would be difficult to access, so I completely re-designed the unit with an integrated wine rack, (yeah, I did that..!), some open storage space, and closed-in storage on top with a lockable side opening for access. Whilst this was a much better use of space, or at least it made the internal space more useable, I then changed the design again at the last minute to have a flip-up lid to make using the internal space even more accessible when the bed was deployed.
Once I was happy with the main internal woodwork I purchased some marine carpeting material and went to town covering almost every surface with it. I have to say that it was not as easy as I expected to glue it on and fold it around the edges, especially when I had not allowed enough tolerance between some of the woodwork. Fortunately, it’s easier to make gaps wider than to make them thinner, and once it was finished I think it looks really great.

I also attached two rollover hinges for the bed extension that I had imported from the USA. One of the early design concepts that Fiona & I had discussed was that the bed should be really easy to set up and not become a daily chore to build the bed every night. We have watched more than enough camper van conversion videos on YouTube where people had devised some complicated but clever seating-to-bed solutions that included either a slide-out panel or sliding bed-base or collapsible table design, that after a couple of months of use every night was considered to be a pain-in-the-arse. During my research, I stumbled across an Instagram post from a chap that had used a set of rollover hinges to create a very straight-forward one-handed simple rear seating-to-bed solution and after some involved searching, I eventually found a manufacturer that sold these super useful hinges that we could get shipped internationally through Amazon. I have to say that these hinges were not cheap but they were very easy to fit and work with elegance and simplicity that takes a lot of beating, and I have no hesitation to recommend this solution to anyone thinking of doing a camper conversion.
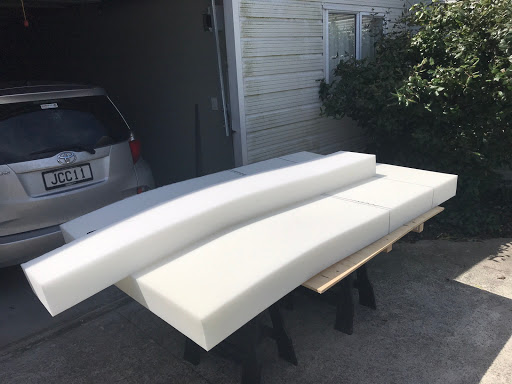
For a long time I laboured under the misguided belief that getting a large piece of upholstery foam to use as a mattress, and cutting it into sections would be both simple and cheap, but as it turns out, it was neither. Even sourcing any old piece of foam was turning out to be a problem and if I wanted something that was going to be in some way firm and supportive it was going to be even more difficult and costly. Over the Christmas period, Fiona & I went off an overnight trip in the van to a local spot where we used my old inflatable air-bed as a mattress which proceeded to deflate during the night and gave us probably the most uncomfortable night’s sleep EVER…!
After that I was convinced that doing a mattress solution on the cheap was not a good idea especially if we had any intention of spending any significant time in the van and that being comfortable was definitely worth paying extra for. Therefore before going out on the next camping trip we purchased a 15cm thick premium foam mattresses suitable for everyday use and cut it to down to shape which turned out to be at least 100% better than the air bed, but ultimately was still just a little too soft for my sizeable bulk to sleep on comfortably. So to add that final touch we purchased two specialist memory foam bed toppers, from a company called Duvelay which bring a touch of real luxury to our sleeping arrangements and will ensure that we will be as comfortable as you can be in a van. The Duvelay’s can be easily rolled up for storage and are light and transportable enough to be used anywhere, not just in the camper and for this reason, are currently installed on our bed in our bedroom at home…!!
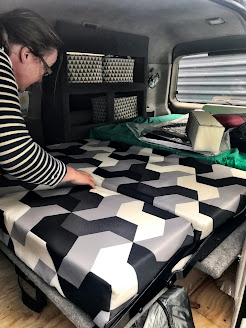
To finish off the bedding arrangements I handed over to Fiona to choose and sew the covers for our various mattress sections. She located a couple of choices of material that fit into our colour design concept and after we selected the bold geometric pattern, she spent a weekend cutting and sewing them into shape. Because of the rollover hinge mechanism, it meant that the mattress is made up of 4 differently-sized and oriented sections which made the sewing a bit more complicated than it could have been, but now that the covers are finished and installed, looks absolutely fantastic and works a treat. Great work Fiona.

Once the bedding solution was done I started work on the last of the internal woodwork that needed to be finished. I put down a hard plastic flooring that looks like diamond plate and built a simple drawer that opens out into the front of the van that will allow us to incorporate a ‘Porta-Potti’ for emergency use which can be pulled out and used even when the bed is in the full sleeping position. The drawer is about 70cm deep and half the width of the bed and provides some much needed ‘deeper’ storage in the van where I expect to store a toolkit and some spares. To finish out the front of the bed platform I also added a simple door to the other half of the under-bed storage area where I plan to install the battery and electrical components in future. Ultimately, I am planning to be building 2 more long sliding drawers that will be accessed from the back of the van, one side of which will be used for our cooking, kitchen and food storage, and the other drawer to be used as additional storage, but that will get done as part of the “Third-Fix” part of the build.
So right now Digby can be used as a fully functional weekend-camper as we have a couple of plastic crates to store all our camping gear and they fit nicely in the under-bed drawer space. Fiona brought a couple of semi-rigid fabric containers that fit very snugly into our rear wardrobe space in which we can put a change of clothes, and there is plenty of other hidden space that we can fill for use on overnight or short trips away over the coming months. There are a whole heap of items left on the build list to finish off the camper which is mainly dependent upon saving up some money to buy some of the more expensive items, like a roof rack, a spare tyre carrier, water tank and the battery and electrical components, but these can wait until next summer as I am happy with what we have achieved so far.


Comments
Post a Comment